


Configure Dual Delivery
When you change the MX Records of your domain to Zoho, all the emails addressed to your domain starts arriving in Zoho. This is direct email delivery.
Apart from the direct email delivery, you can also configure dual delivery or partial delivery to Zoho Mail Servers. The Dual Delivery or Split Delivery can be configured in your Legacy Servers or in Zoho Servers. This will be helpful for users who are in the transition phase and want to evaluate the Zoho Mail Services parallelly without completely discontinuing the current Email Services. This will also ensure Business continuity when you switch the Email Service from one provider to the other.
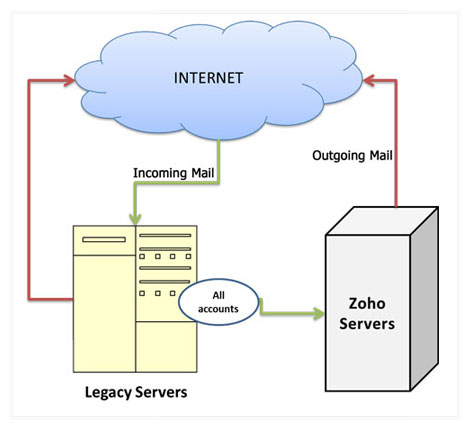
Dual Delivery through your Legacy Email Server
In case you wish to use you legacy server as the primary email server, the MX entries need not be changed. You can configure dual delivery in your legacy server, to route a copy of incoming emails to Zoho or configure your email server in such a way that the emails for a set of email addresses get routed to Zoho Mail Server.
Configuring Dual Delivery in Exchange
You need to decide on the number of ‘Pilot’ Test users for whom you want to set up Dual Delivery in Exchange. Unlike Zoho, email forwarding or email delivery cannot be set up at the Exchange level for the domains. To configure dual delivery in Exchange, you need to set up Contact Objects for the Pilot users and configure each user account to Forward the domain email to the contact email.
Creating New Mail Contact
- Start the Exchange Management Console.
- In the console tree, expand Recipient Configuration, and then click Mail Contact.
- In the action pane, click New Mail Contact. The New Mail Contact wizard appears.
- On the Introduction page, in Create a mail contact for, click New contact, and then click Next.
- On the Contact Information page, complete the following fields:
- Organizational unit By default, the New Mail Contact wizard displays the path to the Users container in the Active Directory directory service. To modify this field, click Browse, and then select the organizational unit (OU) that you want.
- First name Type the first name of the contact. This field is optional.
- Initials Type the initials of the contact. This field is optional.
- Last name Type the last name of the contact. This field is optional.
- Alias By default, the alias is the first name, initials, and the last name of the contact, separated by underscore characters (_). You can modify this field.
- External e-mail address To specify the external e-mail address, perform one of the following tasks: To specify a custom e-mail address, click the arrow next to Edit, click Custom Address, and then in the E-mail address, type the e-mail address.
- On the New Mail Contact page, review the configuration summary, which contains information about the options that you selected for the new mail contact. To make changes, click Back. To create the new mail contact, click New.
- On the Completion page, the summary states whether the contact was successfully created. The summary also displays the Exchange Management Shell command that was used to create the new mail contact.
- Optional: To avoid confusion, hide the newly created Contact object from the Exchange Global Address List for your domain, as follows:
- In the Exchange Advanced tab, check the box next to Hide from Exchange address lists.
- Click Ok to save the changes.
- Click Finish to complete the task.
- Repeat the steps for each pilot Contact you want to add.
Configure Forwarding to the Mail Contact:
- Start the Exchange Management Console.
- In the console tree, expand Recipient Configuration, and then click Mailbox.
- In the result pane, right-click the mailbox for which you want to configure mail forwarding and click Properties.
- In Properties, on the Mail Flow Settings tab, click Delivery Options, and then click Properties.
- Click the Forward to check box. This enables the Browse button.
- Click Browse to open the Select Recipient dialog box. click OK.
- To deliver incoming messages to the mailbox as well as to the forwarding address configured, select the Deliver message to both forwarding address and mailbox check box.
- Click OK to return toProperties.
- Click OK.
- Repeat the steps for configuring forward to Zoho for each Pilot user you have set up.
Configuring Dual Delivery in Google Apps
If you are currently using Google Apps as your Server, you can set up dual delivery in Google Apps to deliver a copy of all incoming messages to Zoho. To forward messages for the entire domain:
- Log into the Google Apps control panel for your domain.
- Click the Settings tab and then select Email in the left column.
- In the Email routing section, click Add another destination.
- In the Destination box, enter mx.zoho.com.
- Specify which accounts the mail server applies the routing rule to by selecting a Deliver email for an option.
- To forward all messages that the Google Apps mail server receives, select Provisioned accounts if you want to duplicate the user set up in Google Apps here.
- Select ‘Unknown Accounts’ to route the emails, addressed to non-existing email addresses to Zoho.
- Make sure that the option ‘Send Bounce Notifications’ is unchecked.
- Click Save changes.
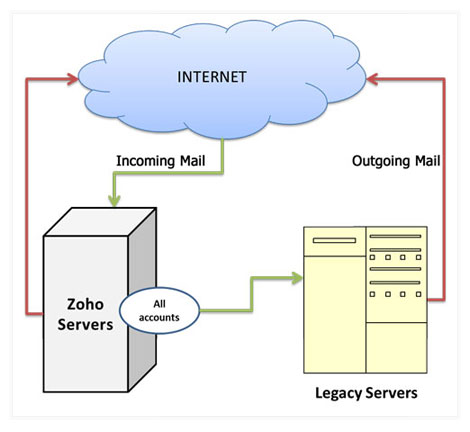
Dual Delivery through Zoho Email Server
You may choose the Zoho Mail Server as your primary server. In this case, the MX entries should be pointed to Zoho. You can configure dual delivery in Zoho Mail server, to route a copy all the incoming emails to your legacy server. Refer here for configuration instructions.
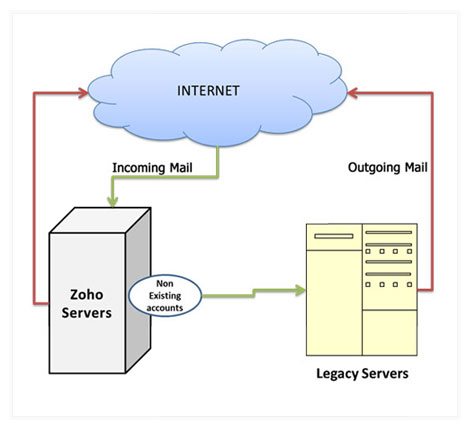
Split Delivery through Zoho Email Server
Even in this case, Zoho will act as the primary server. The email routing, in this case, will happen a little differently, compared to the previous scenario. The email accounts which exist in Zoho will receive the email here itself. When emails are addressed to email addresses that are not in the Organization setup in Zoho, those emails will be routed to the other server. Refer email routing for configuration instructions.
Note:
When you configure dual delivery in Google Apps or in Zoho Servers, you need to add the inbound gateway for your domain in the secondary email servers, to ensure smooth email delivery.